Are you looking for a way to sample in GarageBand without using third-party plugins?
There’s a hidden GarageBand sampler that allows you to map samples to your keyboard. It’s an advanced tool that takes a few extra steps to set up.
In this tutorial you’ll learn how to sample in GarageBand. You’ll also learn how to chop samples with the GarageBand sampler and map them to a MIDI controller.
This method works without using any third-party plugins or equipment. All you need is a Mac with GarageBand installed, and you can follow the entire process.
Keep reading to learn everything from importing samples to exporting your sampled track.
GarageBand’s Sneaky Sampling Features
GarageBand now makes sampling more powerful than ever before. With just a few clicks, you’ll be able to mix, edit and adjust samples until they perfectly fit your project.
But learning to sample in GarageBand isn’t exactly straightforward…
GarageBand is great for composing music, but it’s not the best audio editor. This means that it will take a little more time to trim and slice samples. Also, its built-in sampler isn’t accessible by default. You’ll need to manually enable it if you want to use its additional features.
Overall, GarageBand isn’t an ideal choice for advanced sample-based producers. But still, it has everything you need to create great sample-based beats on a budget.
Now follow along for the step-by-step tutorial.
Step 1: Import Audio into GarageBand
The first step is to import an audio file. (If you’ve already prepared your samples, you can skip to Step 3. Otherwise, follow along for the full tutorial.)
To do this, add a new track to your project and choose the “Record using a microphone…” option beneath the Audio category. This will create a new track where you can drag and drop an audio file from your computer into GarageBand.
Once the audio is imported, it should appear in the main area of your screen.
Step 2: Chop the Sample (Optional)
Now we’re going to slice the audio into smaller pieces.
Not sure how you should chop samples? Read this post on how to chop samples if you want a more in-depth explanation of the different chopping techniques you can use.
To get started, you’re going to slice the audio based on the positioning of the playhead. Move the playhead to the section you want to slice, right click the audio region, and choose Split at Playhead (Cmd + T). This will slice the audio track at the specified region.
Create as many slices as you need. When you’re ready, you can export them to your computer disk. (Heads up: You can only export one slice at a time.)
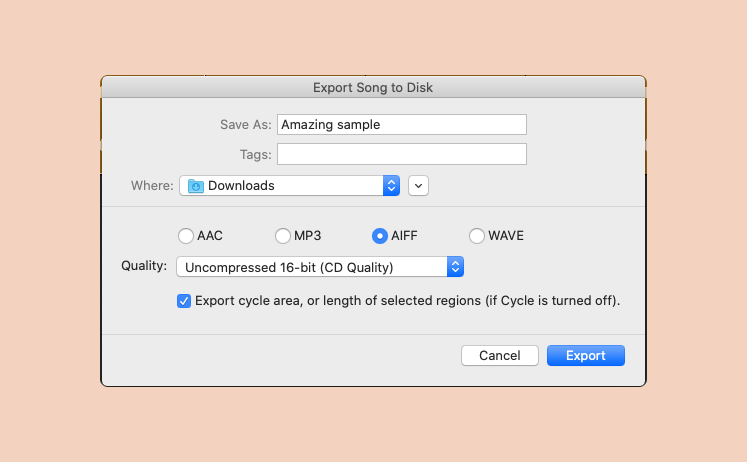
Click the region you want to export, then go to the Share menu and choose Export Song to Disk. In the dialog window that appears, give the audio file a name, choose the export destination, file format and check the box to “Export cycle area, or length of selected regions”.
Now that you’ve prepared your samples, it’s time to add them to the sampler.
Step 3: Set Up the Sampler
GarageBand has a built-in sampler called AUSampler that allows you to map samples to different regions. It’s a somewhat advanced tool, and it’s hidden by default. Before you can use it, you’ll need to enable it in the settings.
How to access AUSampler
First, enable Audio Units in the preferences. Open the GarageBand menu and click on Preferences. Click on the Audio/MIDI section, and check the box that says, “Enable Audio Units”.
GarageBand will now unlock some additional plugins that you can use in your projects.
Next, we’re going to open AUSampler. Create a new Software Instrument track and open the smart controls window from the main menu in the top left corner. Navigate to the Track inspector and open the Plug-ins sub-menu. Click on the instrument name, and select AUSampler (Stereo) from the list of instrument plugins.
Map the Sample to AUSampler
Inside AUSampler, click on the cog icon and choose “Add samples.” Choose the audio files you want to load from your computer, and AUSampler will duplicate the sample and chromatically map it across the keyboard.
Once you’ve imported your samples, remove the default sine wave sample by selecting it in the Layer section, and clicking the minus button.
Now you should have one or more custom samples inside a Layer of AUSampler.
Here’s how to map each sample to separate regions of AUSampler:
Click on a sample inside the Layer, AUSampler will display the zone settings for the audio. Next, in the input field next to the section that says Key Range, change the key that triggers the sample. If you’re not sure which key to use, I recommend applying the keys in ascending order, starting from C3.
Follow the same process for each unique sample in the Layer group, and give each sample a different key.
Now your sampler should trigger one or more samples from different keys on the keyboard.
Customize the settings
With your samples loaded into the sampler, you can customize it so that it performs exactly the way you want.
First, you can disable the Tracks Pitch feature to avoid the samples’ pitch from changing in the sampler. Go to the zone settings for each sample, and turn Tracks Pitch to “Off”.
Next, you can change the polyphony settings to limit how many samples will play at once. At the top of the plugin window, change the Polyphony input to 1.
Finally, go through each of the settings in the Layers and Zone settings to tweak the sampler instrument to suit your preferences.
Step 4: Program Your Samples
Now it’s time to create your masterpiece!
Create a new MIDI region by right clicking inside the empty Instrument Track area and choosing “Create Empty MIDI Region.” Double click the region to open the piano roll and add notes to compose your track.
Repeat this process until you have a complete track.
Finalizing Your Sampled Track
Now that you’ve added the perfect samples to your track, it’s time to finalize your project and make sure everything sounds as good as possible.
First, clean up any unwanted noise or artifacts in the sample, such as clicks or pops. Then, adjust the volume and EQ of each sample so that it blends well with the rest of the track.
Finally, add any additional effects like reverb and delay to give your samples a unique character and enhance their sound. With some careful attention to detail and a bit of experimentation, you can take your sampled track from good to great!
Exporting Your Finished Product
Once you’ve adjusted all the effects, EQ, and volume levels to your liking, it’s time to export your sampled track.
To do this in GarageBand for Mac OS, navigate to the “Share” menu in the top-right corner and select “Export Song to Disk.” From here, you can choose which format you want to save your track as – MP3 or AAC are popular choices – and where you want to save it on your computer.
Once you hit “Export,” your sampled track will be ready for sharing with friends or uploading online.
Conclusion
If you want to take your music production skills to the next level, sampling is a great way to get started. With GarageBand for Mac OS, you can sample without relying on expensive DAWs or third-party plugins, so you don’t have to spend extra money on software.
All it takes is a few simple steps and some creative experimentation. So go ahead, try out sampling in GarageBand and see what you can create!