This tutorial will show you how to sample in Logic Pro X using Quick Sampler.
Quick Sampler is Logic’s new sampler instrument that was introduced in the Logic Pro 10.5 update.
What’s great about Quick Sampler is that it’s powerful and simple. It makes it easy to chop samples and play the slices on your keyboard or MIDI controller.
For this tutorial, we’re going to focus on chopping samples, a technique commonly used in hip-hop.
You’ll get a step-by-step method that’s easy to follow – even if you’re a beginner.
To follow along, all you need is Logic Pro X with version 10.5 or later.
Step 1: Prepare a loop in Logic Pro
The first step is to prepare a loop in Logic Pro.
Why start with a loop? Because it makes chopping the sample easier. As you’ll see, Logic has features that make it effortless to work with loops.
But if your sample isn’t already formatted as a loop, you need to trim it first.
Importing audio into Logic Pro
If you don’t already have a loop, you can start with any piece of music.
If you’re not sure where to find music you can sample, read this post for some tips.
Once you’ve found a song you want to sample, make sure you download it as an audio file in a compatible format.
You’ll need to import the file into Logic Pro:
Open Logic Pro, create a new project, and drag the audio file into a new audio track.
Creating a loop in Logic Pro
After you’ve added the audio file to your project, the next step is to trim it into a loop.
If your sample is already a loop, you can skip this step. Otherwise, follow along for an easy way to find the start and end points for your loop.
To get started, enable Flex Time.
Flex Time allows you to manipulate audio based on certain parameters. For our purposes, we’re going to use it to detect the transients in our sample.
Next, we’re going to enable Flex mode on the sample’s audio track.
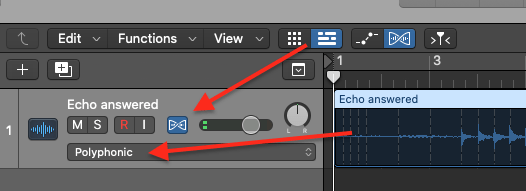
Logic will analyze the audio file and show you a visual representation of the transients (i.e. the dotted lines). This will help you choose the best areas to create your loop.
Ensure that the Flex mode on the audio track is set to “Polyphonic”.
Next, with Flex mode enabled, listen to the audio to find a section you want to loop. Use the transients as your guide for where to set the start and end points.
When you’re ready to create your loop, hover your cursor over the transient where you want to set the marker. You should see an icon that indicates a marker will be created.
Click inside the region to create the markers.
At this point, you should have two markers that indicate the start and end points of the loop.
Right click the Flex region (ctrl + click). A popup menu will appear; choose “Slice at Flex Markers”.
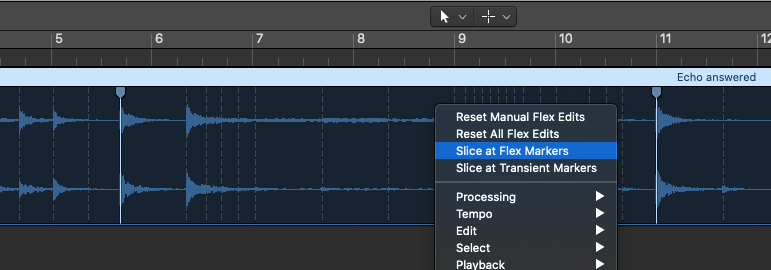
Logic will slice the audio at the markers you set.
You should have three separate regions on the same track. You can delete the other regions and keep the loop you just created.
Stretching the loop to fit the tempo
Now you should have a single audio region in your project.
Next, we’re going to stretch it so that it matches the tempo of our project.
To do that, first we’ll ensure that Flex mode is enabled in the main menu.
Then we’ll confirm that the audio track also has Flex mode enabled, and its Flex mode is set to “Polyphonic”.
This allows you to stretch the audio file without reducing the quality of the audio.
Next, drag the loop to the beginning of the timeline.
To stretch the sample, hover your cursor over the top right corner of the audio, and ensure that the stretch icon appears.
Click and drag the edge of the audio region to fit the correct number of bars on your project. For example, if you created a 4-bar loop, then shorten or lengthen the loop to fit 4 bars in your project.
When you’re finished, turn off Flex mode in the main menu.
Step 2: Set Up Quick Sampler
Your loop is finished! Now it’s time to chop it in Quick Sampler.
In this step, we’re going to set up our Quick Sampler instrument so that it can be played.
We’ll also take a look at some important settings that will make or break your arrangement.
And finally, I’ll show you how to change the pitch of your sample in Quick Sampler without affecting its tempo.
Let’s start with the basics.
Adding your sample to Quick Sampler
We’re going to add the loop we just created to a new instance of Quick Sampler.
Hold down the Option key, then click and drag the audio region to a blank spot in the tracks area. You should see a plus icon appear.
A menu will prompt you to create a new track. Choose the option “Quick Sampler (Original)”.
This will create a new instrument track with your sample loaded in Quick Sampler.
Chopping your sample in Quick Sampler
At the top of Quick Sampler are the sample modes. You can choose between Classic, One shot and Slice.
For this tutorial, we’re going to choose Slice mode so that we can chop the sample.
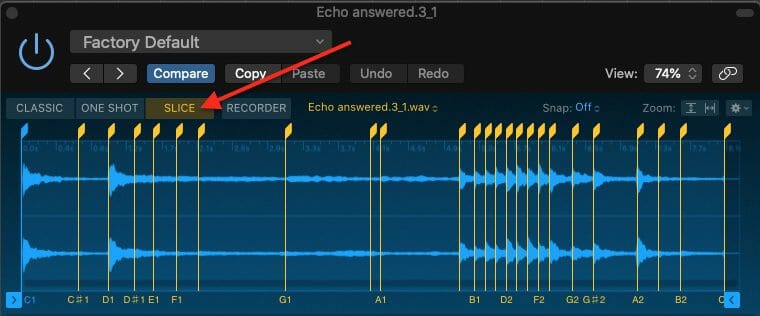
After choosing Slice mode, Quick Sampler will analyze the sample and divide it into slices based on the transients in the sample. The slices are then mapped to MIDI regions so you can play each slice separately.
But rather than allow Quick Sampler to create these regions based on transients, we’re going to create slices based on beat divisions.
To change the slicing mode, click on the “Mode” dropdown menu and change it to “Beat Divisions”.
Quick Sampler will automatically create slices based on the tempo of the sample.
You can change the length of these regions by using the slider for the “Division” parameter to change the slicing increments.
And there you have it.
You’ve successfully chopped the sample in Quick Sampler with equal slices. These slices should also match the tempo of your project.
Updating the settings in Quick Sampler
Before you continue, here are a few settings you should update:
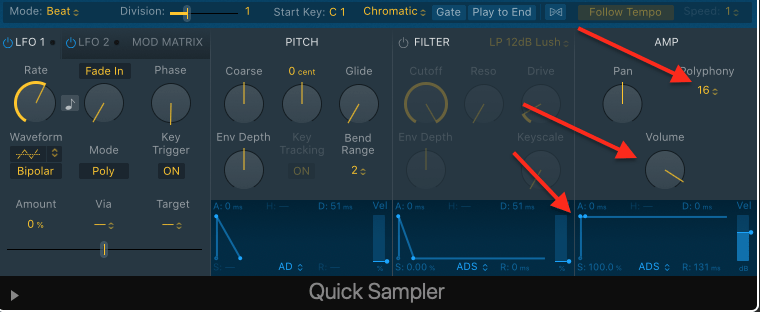
1. Change the polyphony so that only one slice plays at a time.
In Quick Sampler, go to the “AMP” section and click on the “Polyphony” dropdown menu. Change this to Mono.
2. Change the volume of the Quick Sampler instrument to 0dB.
In the “AMP” section, turn the Volume knob to 0dB.
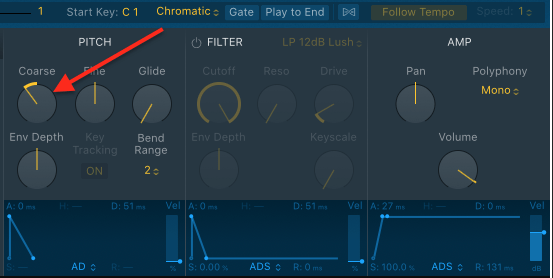
3. Smoothen the transition between samples by changing the Attack of the instrument.
Go to the “AMP” section and adjust the envelop to add a slight delay to the Attack (A).

Changing the key of the sample
If you want to pitch the sample up or down, there’s an easy way to do this in Quick Sampler:
Just go to the “Pitch” section and use the “Coarse” knob to change the pitch by semi-tones.
But you’ll notice a small problem…
When you make changes to the pitch in Quick Sampler, it also changes the tempo of the sample.
To prevent this, you’ll need to enable “Follow Tempo”. Here’s how:
Turn on “Flex Time” in the Quick Sampler menu. The “Follow Tempo” button should also activate; if not, click the button to enable it.
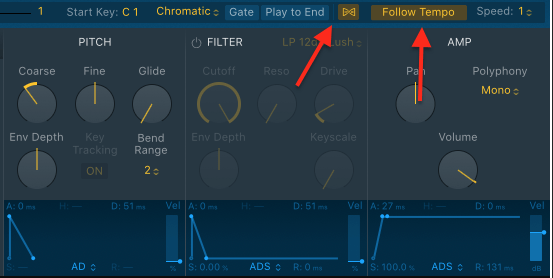
Now Quick Sampler will stretch each slice to match the tempo of your project. So even if you pitch your sample by 24 semi-tones, the length of each slice will stay the same.
Step 3: Create a pattern in the piano roll
Now that you’ve sliced and customized your sample, it’s time to create a new pattern in the piano roll.
This is where the art of sampling comes in.
Let’s take a look at how to get started.
Creating a MIDI region
The first thing we need to do is create a new MIDI region.
Right click a blank space next to the Quick Sampler track in the canvas and choose “Create MIDI Region”. Double click the new region to enter the piano roll.
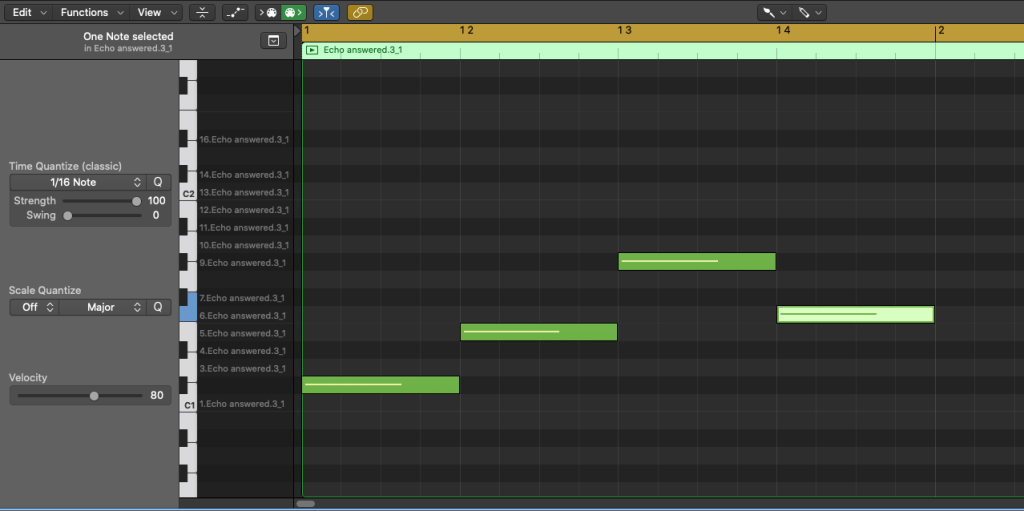
Inside the piano roll, you should see all the slices listed beside the piano keys interface.
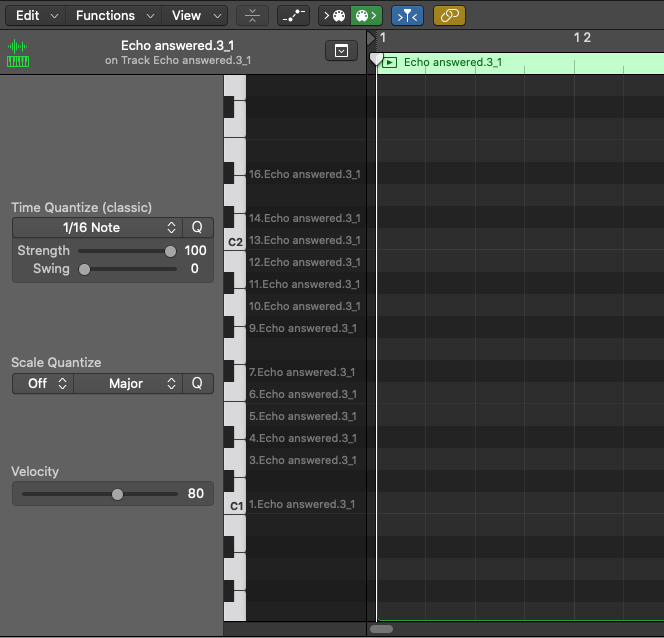
You can click on the keys to hear the slices from Quick Sampler.
To create your pattern, use the Brush tool to add slices in the piano roll.
Alternatively, you can use your keyboard or MIDI controller to play your slices while recording the MIDI events.
Getting creative
Up to this point, we’ve been focused on the technical side of sampling in Logic.
Now it’s time to get creative.
Turn on the loop feature and experiment with your slices.
Keep playing them to find an interesting pattern.
Once you’re done, you can continue to build your beat with new instruments and drum patterns.
The rest of the beat making process is beyond the scope of this tutorial, but you now have the foundation of a sample-based beat.
Final Thoughts
Congratulations! You just learned how to sample in Logic Pro X from scratch.
Now you can practice with different samples and experiment to develop your own style.